NobleCRM comes with a complete Stripe integration, including the Stripe customer portal. The template also handles proration behavior for adding users to a Workspace, as well as updating the seat quantity for the next billing cycle when a user is removed.

You will need your Stripe API secret keys for this step. If your Stripe account has been approved for payments, you will have one secret key for test mode and a different secret key for live mode. If you are not sure where to find your secret keys, read this.
To use the Stripe integration, you must create one product in Stripe for each paid pricing tier in your app. If you want to offer both monthly and yearly pricing for a plan, create one product and add two prices to it— one with a monthly billing cycle and one with a yearly billing cycle.
To ensure seamless communication between Stripe and your app, you need to set up webhooks that will transmit data from Stripe to your app whenever a specific event is triggered.

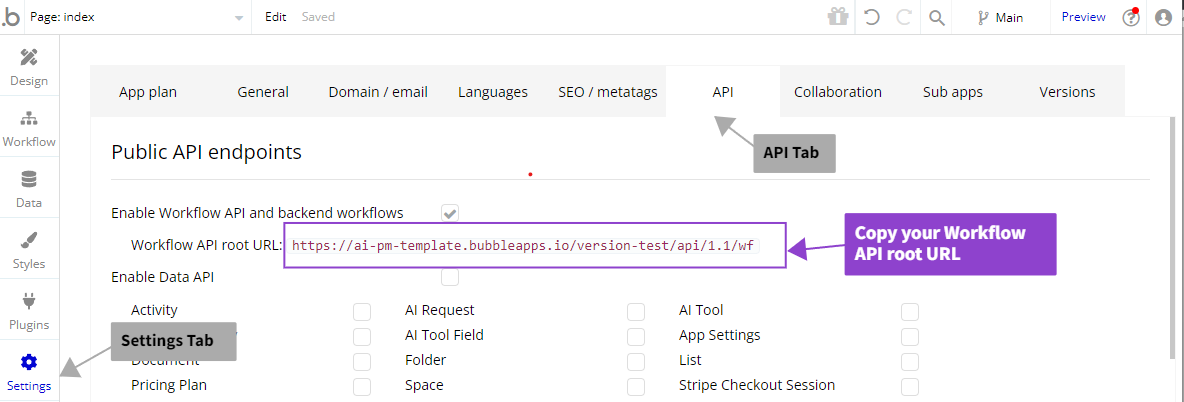
From your Bubble app editor, copy your Workflow API root URL. This is the base URL for your webhook endpoints in Stripe.
The /stripe-webhook endpoint is responsible for updating workspace subscriptions. It listens to the following 3 Stripe events:
customer.subscription.created
customer.subscription.deleted
customer.subscription.updated
Endpoint URL for test mode: https://yourdomain.bubbleapps.io/version-test/api/1.1/wf/stripe-webhook
Endpoint URL for live mode: https://yourdomain.bubbleapps.io/api/1.1/wf/stripe-webhook
Don't forget to replace yourdomain with your actual bubbleapps.io domain.
The /stripe-trial-ending is triggered when a trial has less than 3 days remaining. It listens to the following Stripe event:
customer.subscription.trial_will_end
Example endpoint URL for test mode: https://yourdomain.bubbleapps.io/version-test/api/1.1/wf/stripe-trial-ending
Example endpoint URL for live mode: https://yourdomain.bubbleapps.io/api/1.1/wf/stripe-trial-ending
Don't forget to replace yourdomain with your actual bubbleapps.io domain from Step 2.
The /stripe-checkout-complete endpoint is triggered when a checkout session is completed and the payment was successful. It listens to the following Stripe event:
checkout.session.completed
Example endpoint URL for test mode: https://yourdomain.bubbleapps.io/version-test/api/1.1/wf/stripe-checkout-complete
Example endpoint URL for live mode: https://yourdomain.bubbleapps.io/api/1.1/wf/stripe-checkout-complete
Don't forget to replace yourdomain with your actual bubbleapps.io domain.
The Stripe customer portal makes user subscription management easy for your users and provides a ton of configuration options. For this demo, we are going to be setting up a simple portal that allows users to upgrade, downgrade, and cancel their plan.
